


Luminar Neo Review (My Latest Test Results)
A comprehensive review of the strengths and weaknesses of Luminar Neo photo editing software with the latest test results on the most recent updates.
Luminar | Software | Software Reviews | By Mark Condon and Ana Mireles | Last Updated: January 14, 2025
Shotkit may earn a commission on affiliate links. Learn more.
I decided to update this Luminar Neo review because Skylum’s award-winning photo editing software just got its big fall update.
Luminar Neo is a powerful AI image editor ideal for both novice and experienced picture editors or those who simply want to play around with fun photo effects.
Luminar Neo’s key benefit is its ability to make complex edits simple and fast for any level of user.
By harnessing the power of AI, users can replace skies, enhance portraits, and remove backgrounds, often with just one mouse click.
Powerful AI editing tools improve photos in less time. Affordable one-time price and expandable features.
Thanks to recent updates, various Luminar Neo Extensions bring additional editing powers to the core software, broadening its appeal to photographers and designers.
For this Luminar Neo review, I’ve tested the latest version (v1.21.0/1.21.1) with a selection of RAW and JPEG images.
So, let’s take a closer look together at whether you should buy Luminar Neo.
What is Luminar Neo?
Luminar Neo is a powerful image editor for Mac and Windows, powered by AI technologies that can simplify complex photo editing tasks, making them fast and fun.
It’s available as a subscription or as a one-time purchase, giving users the ability to own Luminar Neo outright if they wish. While buying a lifetime license can be attractive, the subscription does have some advantages. I’ll get into that further on in the article.
Headline AI features in Neo include the ‘god-like’ ability to relight a scene, replace the sky, transfer color palettes, and perform various jaw-dropping portrait enhancements in just a couple of mouse clicks.
The main attraction of Luminar Neo is the opportunity for a complete novice to carry out immensely complex photo editing tasks with a couple of clicks. It’s also useful for more experienced photographers who want to save time or experiment with their image editing.
In addition to this artificial intelligence wizardry, Luminar Neo provides a solid selection of core editing tools that rival other popular image editors.
Numerous presets are supplied (with more available to download/buy), which apply instant photo effects to images to alter their look. AI identifies the image and suggests suitable ‘For This Photo’ Presets to save time.
Luminar Neo pairs up with Luminar Share, a basic mobile app for iPhone and Android devices that allows you to wirelessly transfer your smartphone images to be edited in the desktop Neo software or vice versa to be shared on your favorite social media network.
You can also install Neo as a plugin for Photoshop, a plugin for Lightroom Classic, or a plug-in for Photos® for Mac, allowing it to load from within their respective interfaces.
This is handy if you want to keep using the DAM functionalities of your existing LRC catalog while taking advantage of the AI tools in Neo, for example.
Pros & Cons of Luminar Neo for Photo Editing
- Affordable one-time price available
- Easy and fun to use
- Effective one-click presets
- Impressive AI tools
- Excellent portrait enhancers
- Fast RAW image imports
- Handy extensions help with specific tasks
- Especially useful as a Lightroom Plugin
- 30-day money-back guarantee
- Slow to respond (Gen AI and Presets)
- Limited photo management features
- Limited print and export options
- No GPU acceleration (except Extensions)
- No integrated mobile editing app
- No free trial
What’s New in the Updated Luminar Neo?

Skylum released Luminar Neo in February 2022 with the intention of providing frequent updates. In October 2024, the version Luminar Neo 1.21 was released, and it came with some pretty amazing features.
The biggest updates are only available for subscribers or Upgrade Pass 2024/25 owners. These include two photo editing features and one for image management.
First, there’s Smart Search. This machine-learning feature helps you locate images in your catalog based on their content.
Then, there are two editing features: Color Transfer which allows you to mimic the color palette of any reference picture, and Color Masking, which helps you make precise adjustments.
All other updates are available for every Luminar Neo user. There are many improvements in the Catalog panel, including a star rating system, an improved filtering tool, and the ability to create virtual copies.
Also, Skylum included many bug fixes in this update and improved the overall responsiveness and user experience.
1. Skylum Luminar Neo Installation & Set Up
After downloading and launching the Luminar Neo installer, you’re given the option to install Neo as a plugin for Photoshop and Lightroom Classic (if you’re already an Adobe photo editing software subscriber).
You still can’t install third-party plugins in Luminar Neo (such as Topaz Gigapixel for enlargements) – something you could do with Luminar AI, and I was hoping to see it again.
The program takes up 5.92GB of space on my Mac’s hard drive, which is almost double the size it took when I did the previous review on version 1.17.0. This, however, includes all the extensions.
When the installation is complete, and you’ve created a Skylum account, you’re shown a QR code that installs the companion mobile app Luminar Share.
The app is only for sharing your images and includes no editing features.
2. Importing & Browsing Images

Getting photos into Luminar Neo is dead simple and a refreshing experience for anyone who’s ever tried using Lightroom for the first time.
Clicking the Add Photos button does exactly that – you choose a folder or selection of photos on your hard drive, click Add, and then everything suddenly appears in your Luminar catalog.
Photos were quickly added to my 2021 MacBook M1 (32GB RAM). Testing my wife’s 2020 Macbook Air with 16GB of RAM was also similar.
It’s important to note that photos aren’t really ‘imported’ into Luminar Neo – they are actually being ‘referenced’ in their original location, much like a file browser. This has certain distinct advantages and disadvantages.
The main caveat to this file browser experience is that the photos need to exist somewhere outside Neo, or they appear as ‘missing.’
This means that you’re unable to import images to Neo from your camera’s memory card unless: a) you’re willing to keep the card in the card reader until you’re finished with the images, or b) you transfer the images to your hard drive first, then add the photos to Neo from that new location.
Confused? Basically, when your photos are moved or deleted on your hard drive (external to Luminar Neo), the same thing happens within Neo.
If, however, you delete an image from within Luminar Neo, it’s added to a ‘Luminar Trash’, with the original image remaining intact outside of Neo.
For many photographers, Luminar Neo’s file browser approach to file management will be a breath of fresh air – there’s close to zero wait time for photos to appear in the software, ready to be edited.
However, for professional photographers who need a direct way to get images off their SD card into editing software, Luminar Neo isn’t an appropriate choice.
It’s also worth noting that you can add photos from external hard drives or even network-attached storage (NAS), but as soon as you detach the devices, Neo will no longer be able to show them.
3. Photo Organisation in Luminar Neo

Ignoring the restrictions on importing from non-permanent devices/locations, you have to admire the simplicity of photo management in Luminar Neo.
On the left of the screen, the ‘Catalog’ module consists of 5 locations that auto-update based on your actions:
- All Photos
- Single Image Edits
- Recently Added
- Recently Edited
- Trash
Hovering over each title reveals the number of images in each case, and ‘Recently Added’ and ‘Recently Edited’ offer drop-downs that reveal the dates the actions were performed.
Under this, the ‘Folders’ level houses any folder from your hard drive that you add to Luminar Neo.
Finally, there are the ‘Albums’, which behave similarly to Lightroom Collections, allowing you to compile collections of various images that already exist in your Neo catalog.
You can add multiple photos to an album or create a new one by selecting them all and right-clicking to reveal the options. Oddly, you can’t drag and drop the photos into the Albums panel to create new albums.
4. Catalog Interface

Luminar Neo Catalog’s single photo view shows a filmstrip below. Right-clicking photos in the single view or within the film strip reveals various options:
- Set Flag
- Set Rating (New)
- Rotate
- Flip
- Create Virtual Copies (New)
- Adjustments
- Export
- Export To
- Share
- Open In
- Go To
- Create Album
- Move to Luminar Trash
- Show in Finder
Most of these options are self-explanatory. The ‘Set Flag’ feature allows you to Favourite, Reject, or Unmark using the same shortcut keys as Lightroom.
The new ‘Set Rating’ feature introduces a highly welcome star rating system, allowing you to rank your images beyond simple “love” or “reject” options. This feature can be easily accessed through the star icons.
Another new feature is the ‘Create Virtual Copies’ option, which lets you experiment with different edits on a photo without duplicating the original file.
The ‘Adjustments’ allow you to Sync, Copy, or Paste any image edits made across other photos.
‘Open In’ allows you to open the photo in various apps you may already own: Photoshop, Lightroom, Photos, Elements, and Aurora HDR.
There’s also a heart icon to favorite, an ‘X’ to reject, and an eye icon that shows a before (unedited) version of your image, although I still prefer the implementation of the Before/After tool in Lightroom.
One slight annoyance is the frustratingly narrow side scroll bar, which only comes into partial view when you move your mouse’s scroll wheel.
4.1 Catalog Interface – Generative AI tools

On the right side of the Catalog interface, you’ll find the Generative AI tools. These are available without limitation for Luminar Neo subscribers. However, users who have purchased the lifetime license will have access only until January 1st, 2026.
Overall, the results of the generative AI tools are great. While they take longer than some competitors, the consistent quality makes them worth it.
What I don’t like is that you don’t get any variations. Hopefully, Skylum will add this function in future updates.
GenExpand

GenExpand offers a feature that lets you expand the edges of your photos.
When you drag the photo’s borders, the tool uses AI to fill in the newly created space, aiming to match the style and content of the original scene.
This function can be used to extend panoramic landscapes, alter the aspect ratio of a photo, or simply add more space around the subject of a picture.
The effectiveness of the AI-generated visuals in blending with the original photo may vary depending on the complexity and nature of the image. However, you’ll get better results if you expand small areas and work on one edge at a time.
GenSwap

Using GenSwap, you can replace specific elements in your pictures with AI-generated visuals that integrate with the rest of your image.
You can use this feature to add elements that didn’t exist in the original image, such as adding trees to a previously flat horizon line on a landscape.
However, you can also swap (hence the name) existing elements with others. For example, you can mask an existing house and tell it to create a windmill in its place.
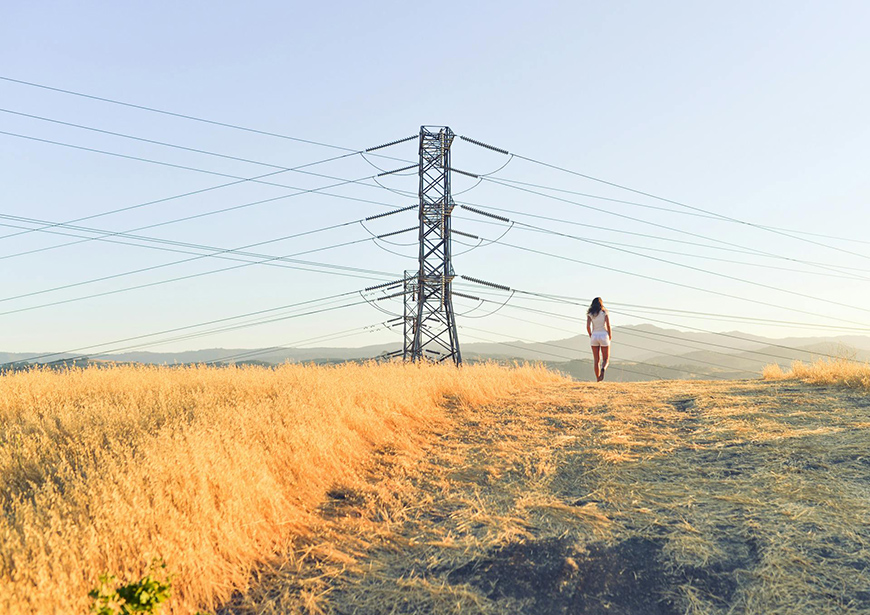
In the above image, I first went to the Edit panel and used the ‘Remove Powerlines’ tool to save time. Then, I went back to the Catalog to use the GenSwap tool to change the transmission tower into a rustic windmill. The whole edit took me just a couple of minutes.
GenErase

GenErase allows you to remove unwanted elements from your images. Unlike traditional background removal tools, GenErase not only eliminates distractions but also intelligently fills the resulting gaps using content-aware AI techniques.
This is best illustrated on the product page here.
While testing, I found that GenErase did a great job of removing random things from my photos but struggled a little with mixed lighting conditions, such as interior lights in a room with sunlight spilling through the windows.
4.2. Catalog Interface – Luminar Extensions

Credit: Skylum website
Another thing you’ll find on the right panel of the Catalog is the Extension modules – these allow you to expand the software’s core functionality.
Extensions are available in Luminar Neo for Pro Plan monthly and yearly subscribers and for owners of the Extensions Pack. Additionally, Extensions can now be purchased separately.
Note that not all the Extensions are located in the Catalog – which is something I find a bit confusing. The ones you’ll find here are HDR Merge, Focus Stacking, Panorama Stitching, and Upscale AI.
The HDR Merge Extension allows you to create high-dynamic-range images from up to 10 bracketed images or simulate the effect by increasing the dynamic range from a single photo.
Other features include auto-aligning multiple images when your shots are slightly misaligned (useful for hand-held shots), and ghost-reduction when there’s a moving object in your otherwise still shot.
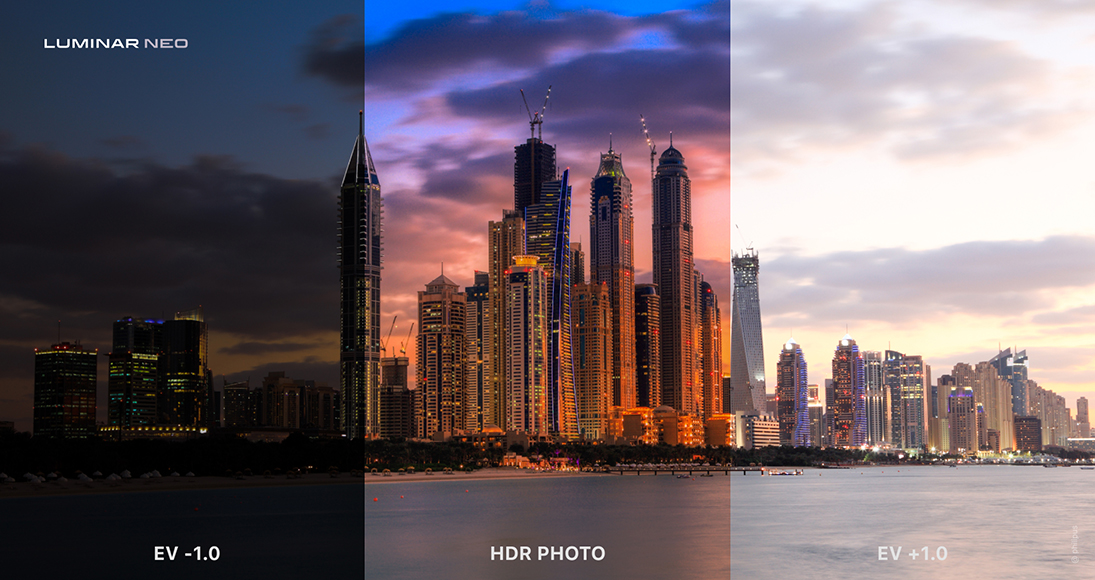
HDR can squeeze every last color and detail from your images.
HDR photography is a popular technique for landscape, architecture, and real estate photographers in particular, or anyone who wants to bring out details in underexposed nighttime photos or fine-tune images with exposure issues.
Since the merge functionality is housed within Neo, you can still take advantage of all of Neo’s other editing tools after producing your HDR image.
You can find out more about the HDR Merge extension and the various ways to get it here.
Upscale AI is a great extension that helps with image resizing, allowing you to upscale a photo up to 6x and increase image resolution naturally. This is great if you need to digitally ‘zoom in’ on an element in a photo, prepare an image for print, and maximize print quality.
The Focus Stacking tool is particularly useful for landscape and macro photography as it allows you to achieve a seemingly impossible depth of field.
The Panorama Stitch extension allows you to blend up to 100 images to create a large panorama. It also supports videos.
5. Luminar Presets Interface

Next to the ‘Catalog’ module is ‘Presets‘ – clicking this reveals a selection of thumbnails with somewhat ambiguous titles, like ‘Experimental’ and ‘Influencer’.
These presets were the headline feature of Luminar AI (named ‘Templates’), promising to save hours of fiddling around with sliders to achieve a desired look.
The ‘For This Photo’ presets are your first taste of artificial intelligence coming to your rescue in Luminar Neo, predicting the one-click ‘look’ that would best complement your photo, based on its perceived contents.
In practice, if your photo contains a person, ‘For This Photo’ will show presets best suited for portrait photography. If the photo is of a landscape, the AI suggestion will show presets such as ‘Scenery’, ‘Sunsets’ or ‘Easy Landscapes.’

Clicking a preset title reveals other associated presets.
If you don’t like the ‘For this Photo’ suggestions, simply scroll and choose any other category. Once you do this, hover over its presets to see a preview before applying them.
Once applied, you can also regulate the intensity with a slider. With its simplicity, the Luminar Neo Presets panel seems to have been designed to encourage experimentation.
6. Luminar Neo Edit Interface
The ‘Edit’ module houses all the manual and automated editing tools of Luminar Neo.

Tools panel
These are the available features in the Tools panel. Note that some may not be available if you don’t have the Pro Plan or the Extension Pack.
- Layers Properties Pro
- Crop AI
Favorites
- Enhance AI
- Sky AI
Image Quality
- Noiseless AI
- Supersharp AI
Essentials
- Develop
- Erase
- Structure AI
- Color
- Black & White
- Details
- Denoise
- Vignette
Landscape
- Sunrays
- Twilight Enhancer AI
- Atmosphere AI
- Landscape
- Water Enhancer AI
Creative
- Relight AI
- Color Transfer
- Magic Light AI
- Dramatic
- Mood
- Tonight
- Matte
- Neon & Glow
- Mystical
- Glow
- Blur
- Film Grain
Portrait
- Studio Light
- Portrait Bokeh AI
- Face AI
- Skin AI
- Body AI
- High Key
Professional
- Supercontrast
- Color Harmony
- Dodge & Burn
- Clone
When clicked, each of the tools reveals multiple sliders and sub-menus.
Anything with a slider invites you to experiment, with the partially hidden sub-menus containing options for when you’re more comfortable with the basic functionality of each tool.
Those coming from more professional-photographer-orientated photo editing software may poopoo the somewhat hodgepodge organisation of the tools, but if you’re new to photo editing, the layout is user-friendly and quickly becomes familiar,
Anything with ‘AI’ after its name denotes something with a very special party trick.
Edits panel
This is kind of like Lightroom’s History tool, keeping track of each edit you’ve made to the image.
You’re also presented with another eye icon for a before/after, a revert arrow to undo each specific edit, and a pen icon, which allows you to make local adjustments like creating masks to add/remove effects.
One thing I found rather confusing was the fact that any preset you apply to your image will be shown in the ‘Edits’ panel, broken up as individual steps of the edit.

While this allows for some granular control over the preset, it’s difficult to tell what differences the individual edits actually made to your image – choosing to control each one feels like a stab in the dark.
Layers panel

You’ll also find ‘Layers’ on the left of the ‘Edit’ module. Clicking the + icon reveals a selection of overlays that you can add to your image to produce various effects: ‘Flares,’ ‘Light Leaks,’ ‘Sparklers’ and ‘Stardust Bokeh.’
You can also load any image from your hard drive to use as a layer for a double exposure effect. Any layer’s opacity and blending mode can be altered to achieve your desired look.
Those hoping for a true layer-based editing experience akin to Photoshop or ON1 Photo RAW will be disappointed, but if all you want is a simple way to experiment with your photos, Neo comes up with the goods.


As you can see in the before/after above, I was able to add a cool flare/light leak effect to an image from a recent wedding I shot using the new Layers feature, and the results look great.
(I also applied one of the Presets that Luminar Neo recommended – all up, the entire edit took less than a minute.)
On the Tools panel, you’ll find the Layer Properties. Here, you can adjust the Opacity and Blend Mode of your layers.
You’ll also find the Masking panel, which has all the traditional masking tools such as Brush, Linear Gradient, etc.
You’ll also find AI masking tools such as Mask AI and Object Select AI. Here’s the new Color Masking tool available from this update (v.21.0)
Lastly, you’ll also find the Background Removal AI extension. I would like to have this extension much more visible in future updates.
7. Editing Tools for RAW files & JPEGs
Ok, here’s an overview of Luminar Neo’s editing tools. After that, I’ll go more in-depth into some of them that I consider the most impressive.

Screenshot
For photographers who like to take a manual approach to their photo editing, the ‘Develop’ tool on the ‘Essentials’ panel is where it all starts.
Here you have the ‘Adjustments’ panel divided into ‘Light,’ ‘Blacks & Whites,’ ‘Curves,’ ‘Color,’ ‘Sharpness,’ ‘Noise Reduction’ (note that this is different from Noiseless AI), ‘Optics,’ and ‘Transform.’
They’re all self-explanatory and similar to all photo editors – except for Smart Contrast, which is unique to Luminar.
You’ll also have a ‘Masking’ panel allowing you to edit carefully. There are manual and AI-powered masking tools.
For users who enjoy AI tools and one-click solutions, there’s a wide variety of tools in the ‘Landscape,’ ‘Creative,’ and ‘Portrait’ modules.
The explanatory labelling of tools is Skylum attempt to make the photo editing process more accessible to the average person. While in Lightroom, you’d need to twiddle with colour temperature, clarity and various other tools to get a golden hour effect, in Luminar Neo, you can get the same result in a single click.
‘Sunrays’ is one of my favorite tools – it still blows my mind despite being several years old.
The ability to place a realistic sun in your image and have the sun’s rays wrap around or poke through objects as if the entire scene were three-dimensional is simply incredible.


Various options finetune the look of the sun’s rays.
Finally, the ‘Professional’ panel houses ‘Supercontrast,’ ‘Color Harmony,’ ‘Dodge & Burn,’ and ‘Clone.’
These are all advanced tools for a manual and more complex editing and retouching workflow.
7.1 Tilt-Shift Blur

Credit: Tom Fournier
This recent update to the ‘Blur’ tool lets you transform life-sized locations or subjects into miniature-scale models.
Just like with the other types of blur, you can adjust the amount, angle, and position of the effect and use masking to selectively apply it.
7.2 Sky Replacement AI
Out of all the AI-powered tools, ‘Sky AI’ (aka the sky replacement tool) is still my favorite and the most impressive.
Whether your photo is a pure landscape or an urban scene with people and buildings, Neo does a jaw-dropping job of swapping out the sky and relighting the scene to suit.
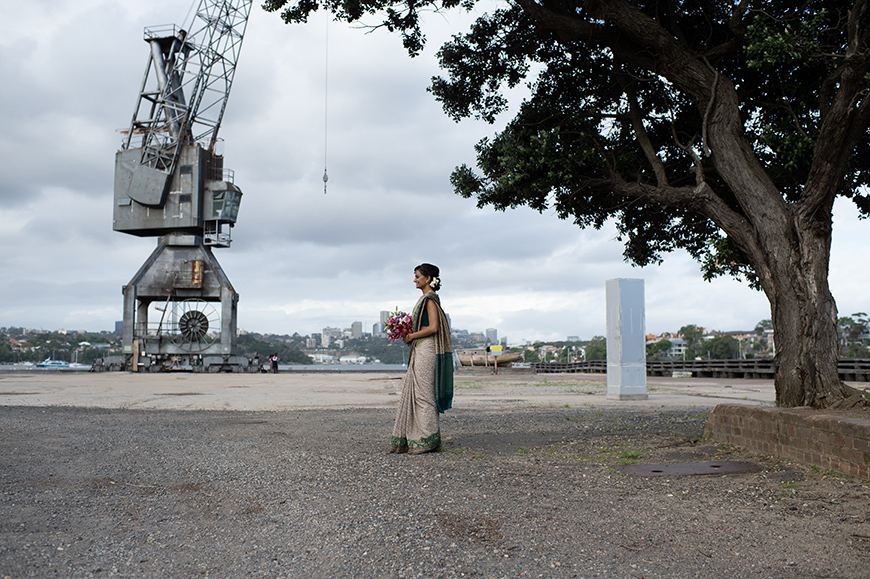
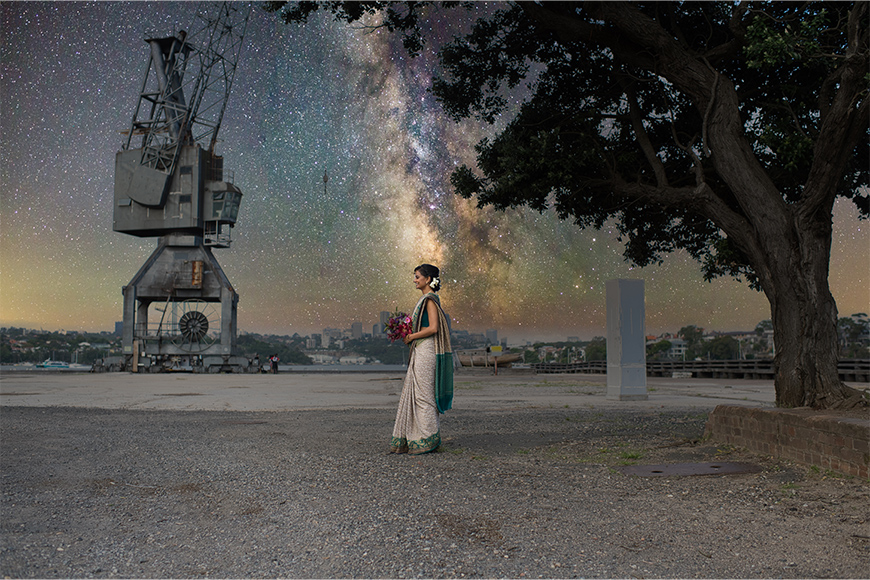
For those who remember, Luminar’s original headline feature was a sky replacement, although recently, most other premium image editing apps also offer something similar.
Even if your original photo is a cloudless scene at midday, with sky replacement, you can make it look like a sunset shot in a few seconds.
Cloning and masking something like this in Photoshop would take hours and a very skilled hand.
7.3 Water Enhancement

While sky replacement is a very popular tool in many photo editing programs, ‘Water Enhancement’ is unique.
The AI will read and identify any water in your picture – whether still or moving. However, you can refine the area if you feel it’s necessary.
Then, with a series of sliders, you can adjust the color, luminosity, contrast, etc. I first tried it with a picture of a lake, which was an easy one.
After that, I turned it up a notch and chose a picture of a waterfall. The results were amazing both times.
7.4 Portrait Bokeh AI
Another great tool that is exclusive to Luminar Neo is the ‘Portrait Bokeh AI’ feature, which uses AI to recognize the subject(s) in your photo, separating them from the background so a fake bokeh can be applied (blurring the background).

‘Portrait Bokeh AI’ is useful for photographers who don’t own expensive ‘fast’ lenses, or when there’s too much light, so you have to close the aperture. It’s also useful when photographing groups, where using a large aperture would normally render some of the subjects out of focus.
7.5 Mask AI
Another key feature is the ‘Mask AI,’ which uses a neural network to detect up to 9 separate elements in a photo: people, skies, architecture, transportation, water, flora, mountains, natural ground, and artificial ground.
In other editing software, masking involves a tedious process of manually ‘painting’ areas with a masking brush. This is no longer necessary in Luminar Neo, with the Mask AI doing it all for you automatically… although with mixed results.
In practice, I found that the Mask AI tool did a mixed job of identifying elements in a photo. As you can see in the screenshot below, it correctly recognized a human, sky, flora, and mountains but incorrectly spotted architecture and man-made ground.
Clicking each of the elements to view the mask revealed further inconsistencies – while the subject and sky were spot on, the other elements weren’t so accurate.
This is where the manual tools come in, with the new Gradient and Radial masks used in conjunction with the regular brush, allowing you to fine-tune everything.

AI Mask correctly identifies some elements in the photo.
I like the direction Mask AI is taking the software, but I admit that there’s still some way to go.
It does a decent job when the photo contains very distinct elements, but of course, this is not always the case with photography.
One nice feature of Mask AI is the ability to copy and paste adjustments to subsequent images, with adjustments applied only to the same masked areas – i.e., it intelligently recognizes the same element in each photo.
When comparing Luminar vs Lightroom, I find that Adobe Lightroom does a better job of masking landscape areas accurately, but they’re on par when masking foreground subjects – see more in our article on how to mask with Luminar.
7.6 Portrait Background Removal AI
Another exciting feature that was released recently is the Background Removal tool, nestled away in the ‘Layer Properties’ panel. Access it by selecting the ‘Portrait Background’ tool, then clicking ‘Remove’.

Credit: Simon Robbel
Depending on the complexity of your scene, Luminar does a decent job at removing the background – anything that the AI misses can be added or subtracted using the ‘Refinements Brush.’
Background removal is useful for product photography, where photographers often need to ‘cut out’ the product and place it on a different background. Luminar Neo offers a simple way to do this effectively.
When you’re happy with the results, you can export the final image as a PNG, then reimport it as an image in the Layers panel – once it’s there, you can drag and drop the PNG onto any other photo you like, effectively creating a new background for your subject.
7.7 Power Line Removal AI
The ‘Erase’ tool works as any other: simply use the brush to mask whatever you want to remove. However, it also contains two of Luminar Neo’s latest tools within its drop-down menu: ‘Remove Powerlines’ and ‘Remove Dust Spots.’
Beware that ‘Remove Powerlines’ only removes the powerlines – transmission towers, traffic lights, or any other object attached to the lines will remain.


After applying the effect to this image, I then simply clicked on the remaining lamp that was now floating in the sky using the brush.
Having to remove all the lines with the Erase brush, including the ones overlapping the building, would’ve been much harder. Now, the entire retouch took seconds.

The dust-spot removal tool also makes Luminar a handy software to restore damaged photos, although Photoshop’s Generative Fill AI filter does a more well-rounded job.
7.8 Relight AI
Another way to use artificial intelligence to help with the editing of an image is to separately adjust the foreground and background light.
Normally in software like Adobe Lightroom, this would either involve masking or manual adjustment layers.
In Luminar Neo, you can use Relight AI to control ‘Brightness Near’ and ‘Brightness’ Far’ settings, using an additional ‘Depth’ slider to fine-tune the overall balance.
In practice, Relight AI works best when there’s a subject in the photo (presumably as it’s clearly the foreground subject), allowing you to adjust brightness based on distance.


As in the example above, I can control my brightness using Relight AI, making me ‘pop’ out from the darker background.
7.9 Magic Light AI
If you’re a fan of the stardust effect, you’re going to love Neo’s ‘Magic Light AI.’
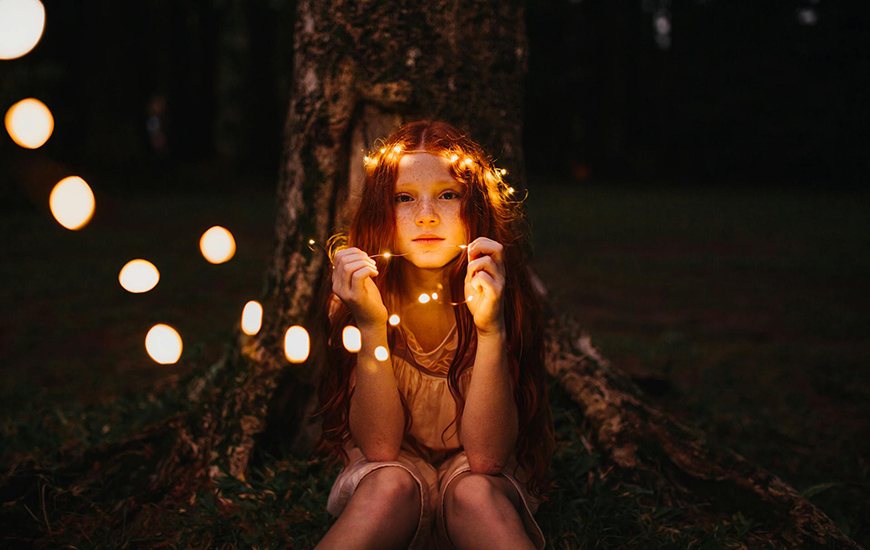
This addition will give your images a magical look that you can thoroughly customize using sliders. Whether you’re creating a fairytale portrait or adding a Christmas feel to your snowy landscape, this is a pretty fun tool.
7.10 Studio Light
‘Studio Light’ is an amazing feature that lets you enhance portraits by replicating complex lighting effects usually achieved with studio equipment, such as barn doors, filters and colour gels.


You can use it to simulate warm sunlight as it spills through a window or the dappling of light and shadow by adding textures and patterns to your portraits.
Add multiple lights and choose the position, color temperature, intensity, and quality of each of them to create the look you want.
As someone who’s experimented a lot with creative lighting techniques, I found Studio Light to give accurate and realistic results, so long as you provide it with a good portrait image in the first place.
8. Latest Features for Subscribers and Upgrade Pass 2024/25 Owners
One of the key advantages of Luminar Neo is that you can purchase it outright.
However, there’s also an option to subscribe to Neo, which brings with it certain advantages – the most important being immediate access to major updates.
As of October 2024, the latest features available only for Luminar Neo subscribers and Upgrade Pass 2024/25 owners are:
Color Transfer (version 1.21.0/1.21.1)

Credit: Lahzeha
If you’ve ever tried to match the color palette of another picture, you know how difficult and time-consuming it can be. The struggle is over, thanks to this new feature in Luminar Neo v.21.
Simply go to the Creative panel in the Edit module. There, you’ll find the new Color Transfer tool.
Once you open it, you’ll see a few presets to choose from, or you can upload the reference picture of your choice. Luminar will then mimic the colors.
Refine the effect using the sliders and the masking tools. You’ll get the desired results in no time.
Color Masking (version 1.21.0/1.21.1)

This new feature expands the variety of masking tools to make more precise adjustments to your images. In this case, you can select a specific color using an eyedropper tool and limit the color range selected with a slider.
Once you’ve created this mask, you can apply any adjustment just to that part. This new tool might not be as glamorous as other features, but it’s certainly useful.
You can find the Color Masking tool in the ‘Layer Properties’ panel.
Smart Search (version 1.21.0/1.21.1)
If you’re anything like me, you might find yourself looking for pictures that you know in your head exactly how they look, but you can’t remember how you saved them.
This was a problem in Luminar because you could only search by file name, extension, and other data you might not remember.
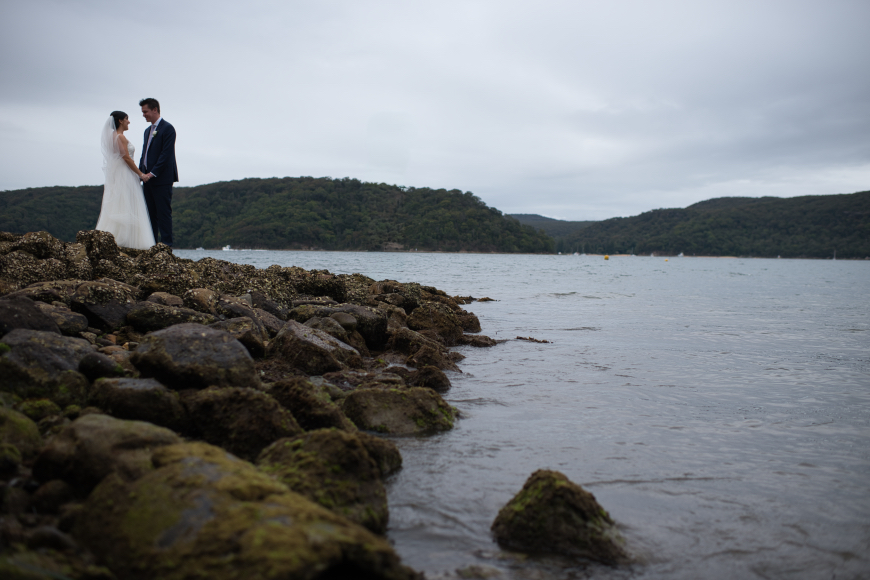
Now, you can type keywords that describe the content, and the Smart Search will find them for you. For example, I typed bride, and it found the two photos of weddings featuring a bride I had in the catalog.
This is certainly a massive time saver.
9. Output and Sharing

Sharing options are definitely limited.
Once you’ve edited your photos, you may wonder what next – how do you get your photos out of Luminar Neo?
The answer lies in a tiny share button located in the top right corner of Neo – clicking it reveals four sharing options: ‘Disk’, ‘Messages’, ‘Mail’ or ‘Share to Device’ via the companion app.
Why Skylum chose not to include all these options in a dedicated export module baffles me.
Another bizarre omission is any dedicated print module – the only way to print images from Luminar Neo is by clicking File > Print in the top menu, which exports your chosen image to your computer’s default print app.
The lack of export and print options is all rather anti-climatic. After making your photos look amazing with all the various AI tools, you’re left wondering why Skylum isn’t as excited as you to share or print them!
The inability to control export settings or the print process may be a deal-breaker for professional or keen hobbyist photographers.
However, many photographers won’t care. It’s a straightforward process; at the end of the day, you can still get your photos out of Neo to store, share or print.
The option to ‘Share to Device’ is an odd one. You’re instructed to scan a QR code using your phone to connect the Luminar Share app to the desktop Neo software.
From here, you can ‘Send Photos to Luminar Neo’ or ‘Mirror Luminar Neo’ – the latter option lets you see any edits you make to your image in real time.
At first, I dismissed the companion app as completely useless, but in time I realized its appeal to Instagrammers, in particular as a way to share Luminar Neo creations on Instagram in fewer steps.
It’s also a handy direct way to transfer any images shot on your phone to Neo without any noticeable degradation in image quality.
10. Overall Performance of Luminar Neo

Luminar Neo runs quite smoothly, especially compared to its previous versions. I have to say things have improved in the performance department.
However, there are still some speed issues, most notably when you apply presets or use any of the processor-intensive AI tools for the first time.
For example, once you choose a Preset category, it takes several seconds to load the presets available in it. However, once they load, you can hover over them and preview the changes on your picture without any lag.
The AI tools, especially the generative AI ones, are quite slow compared to other programs. You’ll see an animated graphic at work and tips to improve the results appear while the system works.
This is an improvement I hoped to see when I last reviewed the software, as I found it disconcerting not to see an indication of whether the software was processing a task or not.
Aside from the headline AI features, everything else functions well, with good responsiveness and smooth transitions.
There’s little to no delay when switching between the ‘Catalog’, ‘Presets’, and ‘Edit’ modules, which is something Lightroom usually struggles with.
Adding images to Luminar Neo is lightning fast, although you do need to wait a second for the image to render if you want to edit it.
Some users would prefer to have Luminar Neo GPU acceleration – rather than relying on the CPU to perform processor-intensive tasks.
All in all, as long as your computer meets and preferably exceeds the minimum system requirements and you’re aware of the lack of any indication that an image is processing, using Neo is much less frustrating than it used to be.
11. Using Luminar Neo as a Plugin
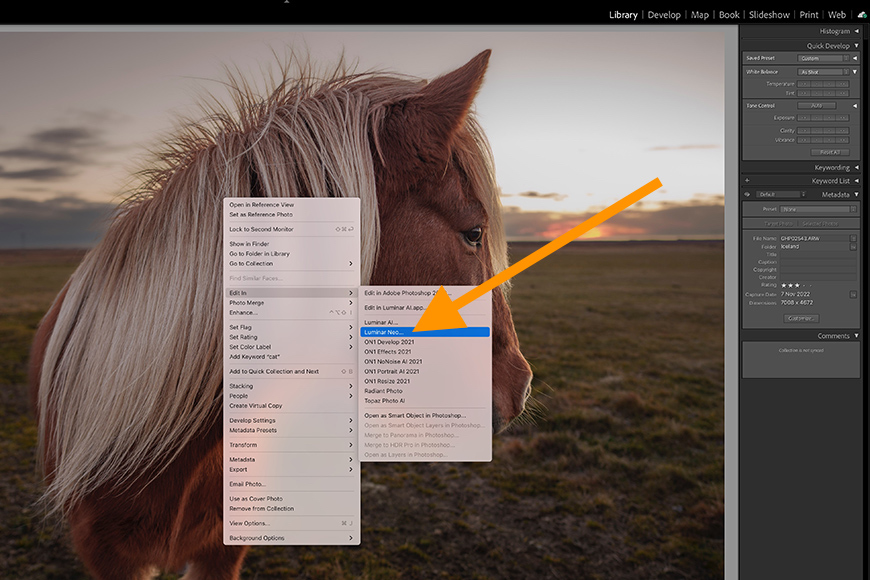
For anyone already engrained in the Adobe ecosystem, using Luminar Neo as a plugin is a great way to get the best out of both software.
I use Adobe Lightroom daily to organize and edit photos and enjoy the editing process as part of my professional and personal workflow.
When there’s a specific edit that would be best performed with Luminar Neo (such as removing power lines), all you need to do is right-click on the image in Lightroom and select Edit In > Luminar Neo.
Then you choose TIFF, PSD or JPG as the duplicated file, keeping the original RAW or JPEG Lightroom image untouched.
This opens a ‘child’ Luminar window, where you can continue the edit using all the fancy Luminar tools.
When you’re done, the edited file is transferred back to Lightroom. Overall, it’s an efficient workflow, although I wish the transfer occurred quicker.
One thing to note is that you need the original file in your Lightroom catalog to use the Edit In command – it won’t work with Lightroom Smart Previews.
You can also use Luminar Neo as a plugin for Photoshop and Photos® for Mac.
How Much Does Luminar Neo Cost? (Luminar Neo Price)
The Luminar Neo price has been rather confusing ever since Skylum introduced various ways to purchase it. This has improved – now there’s only a subscription paid yearly and a one-time purchase of a lifetime license.
However, there are still a few things I couldn’t make out.
One of the main differences between the subscription and the lifetime license is the access to updates. So, if I buy the lifetime license today, which version do I get? And how much will it cost to upgrade or to buy the extensions?
Currently, there’s a version 21.2. So, would I get the v.20.0? When will version 21.21 will be available as a one-off purchase? So, it’s still confusing.
In any case, the price changes several times during the year based on special offers and seasonal packs. I haven’t listed exact Luminar prices here due to the changeability.
Tap here to see all pricing in your currency >>
(All options come with a 30-day money-back guarantee since no Luminar Neo free trial is available.)
You can use Neo on two computers regardless of which option you purchase (this was previously only available with the Pro subscription).
Who is Luminar Neo for?
Buy Luminar Neo if:
- You want to save time editing photos. There’s no denying how useful the AI tools are in Luminar Neo. There’s no simpler and faster way to perform certain complex edits using AI photo tools, and the one-click presets make your photos undeniably prettier.
- You don’t want to pay for an Adobe subscription. While Luminar Neo is definitely not a replacement for Lightroom or Photoshop, it does offer many of their tools and several that don’t exist on either platform.
Luminar Neo can be bought outright for the same price as a few months’ Adobe subscription, making it great value for money. It also has more AI photography related features.
- You find Photoshop too complicated. Again, they’re very different programs, but Neo can help you perform complicated image edits in seconds that would take you hours in Photoshop.
- You want to have fun with your photo editing. Playing around in Neo is fun. The interface encourages experimentation, and tool labeling is mostly simple and self-explanatory.
- You’re a heavy Instagram user and need a simple way to polish and share photos.
Don’t Buy Luminar Neo if:
- You need powerful photo management tools. Neo is more of a photo browser than it is a photo manager. The distinct lack of keywording/tagging/sorting tools makes it a no-go for pros who require this functionality.
- You need various print options. There’s no way to print photo sheets, collages, etc. You can only control print sizes from within your computer’s default printing app.
- You need an integrated mobile editing app. While you can wirelessly transfer images to and from Luminar Neo to the smartphone app, you can’t do much else with it. It’s a far cry from the excellent Lightroom Mobile app. There is a Luminar Mobile app available for iPhone and iPad, but it’s not a mobile version of Luminar Neo.
- You don’t have a powerful PC or Mac. Check the Luminar Neo recommended specs. If you don’t meet them, the editing experience will be sluggish.
Alternatives to Luminar NEO
- Lightroom – This is the most obvious alternative to Luminar Neo. However, it doesn’t have layering options, so you can’t replace the sky or use overlays. It is more powerful in other tasks, though.
- Adobe Photoshop – A powerful vector graphics editor and image manipulator with a steep learning curve. Photoshop can replace skies and perform portrait retouching like Neo, but it’s much less user-friendly and also requires a monthly subscription.
- GIMP – A free, open-source alternative to Neo with a rather dated interface and no AI-powered tools. It’s also not suitable for batch editing or managing a photo library.
Final Words
There’s no denying that Luminar Neo has some impressive party tricks.
The entire focus of Skylum’s marketing and the furor surrounding its release has been on these headline AI features. In that, Neo completely delivers – it’s a formidable AI photo editing software.
As a ‘regular’ image editor, it offers all the tools most photographers will ever need for a manual editing experience.
It falls short, however, as a one-stop-shop for all your photo management/editing needs – this is why it’s also been developed as a free plugin for Lightroom, a far superior DAM.
At first, I thought a professional photographer like me would not need Luminar Neo, but I was wrong. In fact, I find myself opening Neo to perform quick image edits that would normally take much longer or just to play around with my photos.
In this experimentation, I’ve grown to enjoy using Luminar Neo – editing photos is no longer a laborious task or a means to an end.
Furthermore, for amateur photographers or those simply unaccustomed to complex post-production techniques, Luminar Neo is a silver bullet to achieving things that would otherwise be impossible.
It’s hard to resist once you accept Luminar Neo for what it is. It’s a simple, powerful, enjoyable and affordable software that continues to improve.
Powerful AI editing tools improve photos in less time. Affordable one-time price and expandable features.
Frequently Asked Questions About Luminar
Is Luminar Neo better than Luminar AI?
Yes, Luminar Neo is much better than Luminar AI since it has the latest and greatest photo editing features provided by Skylum. Neo also supports Extensions which make the core software even more powerful. Neo is built on a different framework to AI which means it can be updated more easily and more regularly, which is better for the user.
Does Luminar Neo replace Luminar AI?
Although Skylum has not said this officially, the likelihood is that Luminar Neo will replace Luminar AI in due course. Users purchasing Luminar for the first time are recommended to buy Luminar Neo.
Is Luminar Neo better than Lightroom?
For certain artificial intelligence-related tasks, yes, Luminar Neo is better than Lightroom – it can perform complex editing tasks more quickly and more simply. However, Lightroom’s photo management, printing options, data management and mobile app are superior to Luminar Neo.
Is Luminar Neo better than Photoshop?
Photoshop is the more powerful layer-based image manipulation software, but Luminar Neo can perform similar tasks much more quickly and easily. For beginners or inexperienced image editors, Luminar Neo is better than Photoshop, although there are some editing actions it cannot perform.
Is Luminar Neo a one-time purchase?
Yes, Luminar Neo is a one-time purchase, meaning you don’t need to pay a monthly subscription to be able to use it. However, there is also the option of a subscription plan, which provides additional benefits such as free lifetime upgrades, extensions and more.
Does Luminar Neo work on iPad?
No, Luminar Neo only works on PC and Mac. However, its developer Skylum Software released an iOS app called Luminar Mobile.
Is there a Luminar Neo Trial?
No, there is no trial from Luminar Neo, but there is a 30-day money-back guarantee if you’re not satisfied with the software.
What are the Supported Languages?
- English
- German
- Spanish
- French
- Portuguese
- Italian
- Chinese Simplified
- Chinese Traditional
- Korean
- Japanese
- Dutch
- Polish
- Swedish
- Norwegian
- Danish
- Ukranian
More info here.
What is the latest version of Luminar Neo?
The latest version of Luminar Neo is v1.21.2. It was released in October 2024.
Is there a Luminar Neo User Guide PDF?
Yes, you can download a Luminar Neo PDF user guide from this link.
Resources & References

Mark Condon is a British wedding photographer and editor of Shotkit. When he’s not taking photos or reviewing the latest camera gear and software, Mark can be found cycling around the northern rivers.

Ana Mireles is a Mexican researcher that specializes in photography and communications for the arts and culture sector.

👋 WELCOME TO SHOTKIT!

ABOUT YOUR EXPERT
Mark Condon is a professional photographer with 10+ years of experience in taking and editing photos using a myriad of photo editing tools. His current software of choice is Lightroom, using Photoshop for complex edits and Luminar Neo for time-saving edits.
LUMINAR NEO SAVING
 Use shotkit10neo to save $10 - tap here to claim 🚀
🔥 Popular NOW:
